Showing posts with label Samsung Note 7 Manuals. Show all posts

Set Up Voicemail On Samsung Galaxy

How to Set Up Voicemail On Samsung Galaxy
Set Up Voicemail On Samsung Galaxy - Your Samsung voicemail and password should have been set up initially by your wireless service provider when the device was activated. Learn how to setup, settings, access from Samsung Galaxy or other device. If you are having issues accessing your voicemail, please contact your wireless service provider.

Set Up Voicemail On Samsung Galaxy

Access voicemail on Samsung Galaxy by listening to the messages or by reading them in the visual voicemail application on your on Samsung Galaxy series.

Manual to Set Up Voicemail On Samsung Galaxy

Screens Display and settings available may vary by wireless service provider and software version.
    Manual to Set Up Voicemail On Samsung Galaxy
  1. From the Home screen, touch Apps .
  2. Touch Phone .
  3. Touch and hold the number 1 or, if available, touch . The icon is displayed at the top of your screen when you have a voicemail.
How to access voicemail on Samsung Galaxy
Access Voicemail from Samsung Galaxy
  1. From a Home screen, tap the Phone (located in the lower-left).
    • If not available, navigate: Apps Apps icon > Phone.
  2. From the Keypad (green icon located at the bottom), touch and hold the number 1.
    • Alternate method: Enter *86 (*VM) then tap the Send icon.
  3. If prompted, enter the voice mail password then press the # key.
Access Voice mail from a different Phone or when Outside the service provider coverage area:
  1. Call your 10-digit mobile number.
  2. If dialing from an international location, you need a Place an International Call for additional assistance.
  3. As soon as the Voice Mail greeting starts, press the # key then enter the Voice Mail password.
  4. If prompted, re-enter the mobile number.

Set Up Voicemail Guide

This article applies only to Basic Voicemail for sample from Verizon Wireless USA. It's show you how to set up Voicemail, add a pause so that a PIN can be entered and voicemail accessed without entering a PIN each time.

Voicemail Tutorial
Set Up Voicemail On Samsung Galaxy

Updating Voicemail service on your Galaxy phone. If you've been notified of these changes, you need to set up a new voicemail box in order to receive new voice messages.

How to Set Up Voicemail On Samsung Galaxy
Learn set up voicemail by follow this voice mail manual instuctions:
  1. Call *86 (*VM) from the handset or the 10-digit mobile number from another phone.
  2. If a system greeting is played, press the Pound key (#) immediately to interrupt the greeting.
  3. Follow the instructions for choosing the language options then press the # key to confirm the choice.
  4. Press 1 for English then press the # key to confirm.
  5. When prompted, enter the 4-7digit password then press the # key.
  6. If setting up the password for the first time, it can't have repeating digits (e.g., 1111) or consecutive digits (e.g., 1234).
  7. When prompted, say the signature (or name) then press the # key.
  8. To confirm the signature (or name), press the # key.
  9. When prompted, say the greeting then press the # key.
  10. To confirm the greeting, press the # key.
  11. To set up additional features, refer to Voicemail Options for assistance.
We hope this manual / tutorial help you to setup voicemail on Samsung Galaxy, settings, access from Samsung Galaxy or other device. If you are having issues, more settings and accessing your voicemail, you can contact your service provider to better solutions.

Restore Samsung Galaxy To Factory Settings

How to Restore Samsung Galaxy To Factory Settings
Restore Samsung Galaxy To Factory Settings - Restore your device’s settings or perform a factory data reset. You can reset and restore all settings and network settings back as a new from the official Samsung. By reading this manual will help and guide you to restore Samsung Galaxy to Factory settings also set the device to restart at a preset time for device optimisation or device freezes or hangs, you may need to close apps

Restore Samsung Galaxy To Factory Settings

You can set your device to perform a factory data reset if you enter the unlock code incorrectly several times in a row and reach the attempt limit. If you got most Galaxy prolems, follow this instrustion manual:

Restarting the device
  • If your device freezes or hangs, you may need to close apps or turn off the device and turn it on again.
Forcing restart / Hard Reset
  • If your device is frozen and unresponsive, press and hold the Power key and the Volume Down key simultaneously for more than 7 seconds to restart it.

Reset and Restore To Factory Settings
Samsung Manual to reset facory settings:
  • Launch the Settings app, tap Lock screen and security → Secure lock settings, and then tap the Auto factory reset switch to activate it.

Your device freezes or encounters a fatal error
  • Try the following solutions. If the problem is still not resolved, contact a Samsung Service Centre.
Manual Resetting the Samsung Galaxy

Restore Samsung Galaxy To Factory SettingsBefore performing the factory data reset, remember should make backup copies of all important data stored in the device before you got problems or upgrade to new device. Encrypt SD card will set the device to encrypt files on a memory card. If you reset your device to the factory defaults with this setting enabled, the device will not be able to read your encrypted files. Disable this setting before resetting the device. If you registered a Google account to the device, you must sign in to the same Google account after resetting the device. If the methods above do not solve your problem, perform a factory data reset.

How to Restore Samsung Galaxy To Factory Settings
Samsung User Guide to reset facory settings some people said master reset:
  • Launch the Settings app and tap General management → Reset → Factory data reset →RESET → DELETE ALL.
Restore Samsung Galaxy
Sync, back up, or restore your Samsung Galaxy device’s data using Samsung Cloud. You can also register and manage accounts, such as your Samsung account or Google account, or transfer data to or from other devices via Smart Switch.
  • On the Settings screen, tap Cloud and accounts.
Regularly back up your data to a safe location, such as Samsung Cloud or a computer, so that you can restore it if the data is corrupted or lost due to an unintended factory data reset.
  1. Samsung Cloud: Manage the content that you want to store securely in Samsung Cloud. Check the usage status of your Samsung Cloud storage, and sync, back up, and restore your data.
  2. My Profile: Manage your personal information and Samsung account details.
  3. Accounts: Add your Samsung and Google accounts, or other accounts, to sync with.
  4. Backup and restore: Keep your personal information, app data, and settings safe on your device. You can back up your sensitive information and access it later. You must sign in to your Google or Samsung account to back up or restore data.
  5. Smart Switch: Launch Smart Switch and transfer data from your previous device.
Restore Samsung Galaxy To Factory Settings
Back up data and Restore from Samsung Cloud
Back up data from your previous device to Samsung Cloud and restore the data to your new device. You must register and sign in to your Samsung account to use Samsung Cloud.

Backing up Samsung Galaxy Data
  1. On your previous device, sign in to your Samsung account.
  2. Launch the Settings app, select the backup option, and back up your data.
    • If your device supports Samsung Cloud, launch the Settings app, tap Cloud and accounts → Samsung Cloud → Backup settings, and then back up your data.
    • The data backup method may vary depending on your model.
    • Some data will not be backed up. To check which data will be backed up, launch the Settings app, tap Cloud and accounts → Samsung Cloud → Backup settings.
Restoring Samsung Galaxy data
  1. On your new device, launch the Settings app and tap Cloud and accounts → Samsung Cloud → Restore.
  2. Tap and select the previous device from the devices list.
  3. Tick the data types you want to restore and tap RESTORE NOW.

Back up and Restore Secure Folder on Samsung Galaxy Series

Back up content and apps in Secure Folder to Samsung Cloud using your Samsung account and restore them later.

Back up Secure Folder Data
  1. Launch the Secure Folder app and tap → Settings → Backup and restore.
  2. Tap Add account and register and sign in to your Samsung account.
  3. Tap Back up Secure Folder data.
  4. Tick items you want to back up and tap BACK UP NOW.
Data will be backed up to Samsung Cloud.
Restoring Secure Folder Data
  1. Launch the Secure Folder app and tap → Settings → Backup and restore.
  2. Tap Restore backup.
  3. Select a device and the data types you want to restore and tap RESTORE NOW.
Backed up data will be restored to your Samsung Galaxy device.

Backup and Restore Samsung Galaxy

Keep your personal information, app data, and settings safe on your device. You can back up your sensitive information and access it later. You must sign in to your Google or Samsung account to back up or restore data.

Using a Samsung account
  • On the Settings screen, tap Cloud and accounts → Backup and restore → Backup settings for the Samsung account, tap the switches next to the items you want to back up to activate them, and then tap BACK UP NOW.
Data will be backed up to Samsung Cloud.

Automatically back up data
  • To set the Samsung Galaxy to automatically back up data, tap the AUTO BACK UP switch to activate it.
Restore From Samsung Cloud
  1. To restore backup data from Samsung Cloud using a Samsung account, tap Restore.
  2. Select a device and the data types you want to restore and tap RESTORE NOW. The selected data will be restored to your Samsung Galaxy.
Back Up Using a Google account
  1. On the Settings screen, tap Cloud and accounts → Backup and restore
  2. Tap the Back up my data switch for the Google account to activate it.
  3. Tap Backup account and select an account as the backup account.
Restore Using Google account
  1. To restore data using a Google account
  2. Tap the Automatic restore switch to activate it.
  3. When you reinstall apps, backed up settings and data will be restored.
Samsung Galaxy Tips:

Always make backup copies of all important data stored in the Samsung Galaxy series. Otherwise, you cannot restore data if it is corrupted or lost. Samsung is not responsible for the loss of data stored in the device.

Galaxy S7 Edge MicroSD Settings Guide and Tutorial

Galaxy S7 Edge Guide and Tutorial
Galaxy S7 Edge MicroSD Settings Guide and Tutorial - With the Galaxy S7 and Galaxy S7 Edge, Samsung conveyed back the SDCard for Galaxy S7 Edge card space to much enjoyment. While they may have skipped on Android 6.0's Adoptable Storage, there may not be that enormous of an issue, since they are as yet permitting you to move applications over to an embedded SD card and exploit cards up to 200GB to Galaxy S7. Since a number of you might go to the S7 or S7 Edge from a past Galaxy gadget and haven't seen Samsung's freshest usage of a Galaxy S7 SD card slot opening, we thought we'd impart that to you today.

Galaxy S7 Edge MicroSD Settings Guide and Tutorial

Presently, once you have the SIM plate out, you'll see there are two openings: one is for your nano SIM and the other is for a microSD card. In the video underneath, you'll see precisely where to put each, however you'll additionally perceive how sensitive and watchful you should be while doing as such, particularly as you slide the plate once more into the telephone.

This isn't a troublesome Galaxy S7 SD card support procedure, however once more, simply be watchful. Here Galaxy S7 Edge Guide embed or remove the MicroSD™ Card in the Galaxy S7 Edge :

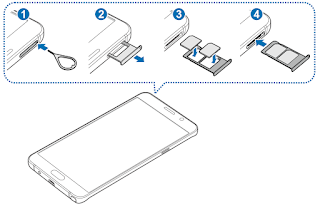
Your gadget gives you a chance to utilize a microSD, microSDHC™, or microSDXC™ card to grow memory space. This protected advanced card gives you a chance to trade pictures, music, and information with microSD perfect gadgets. Embed the microSD Card with the ejector instrument into the opening in the SIM and microSD card plate on the highest point of your gadget, as demonstrated as follows. At the point when the plate flies out, haul it out of the gadget. Please, take mind not to embed the ejector device into the amplifier gap likewise on top of your gadget.

Painstakingly put the Galaxy S7 SD card size / microSD card into the bigger opening in the plate and embed the plate. Galaxy S7 Guide SIM card is in the littler opening, bring down on the plate.

Galaxy S7 Edge Tutorial Expel the microSD Card
  1. You should unmount the microSD card before expelling it.
  2. From the Home screen, touch Apps .
  3. Touch Settings .
  4. Look to and touch Storage .
  5. Touch alongside SD™ card to securely unmount the microSD card.
Galaxy S7 Edge MicroSD Settings Guide and Tutorial
Embed the ejector instrument into the opening in the SIM and microSD card plate on the highest point of your gadget, as demonstrated as follows. At the point when the plate flies out, haul it out of the gadget. Take mind not to embed the ejector device into the mouthpiece gap likewise on top of your Galaxy S7. Here the expel the microSD card from the plate and reinsert the plate.

SD Card Recommendations for Galaxy S7 Edge
  1. microSD Card Classes
  2. microSD cards have limit up to 2GB.
  3. microSDHC (High Capacity) cards offer limit up to 32GB.
  4. microSDXC (eXtended Capacity) cards have limit from more than 32GB and up to 2TB, as of now.
  5. Every sort of card has a speed rating of 2, 4, 6, 8, or 10, from slowest to quickest.
Galaxy S7 Edge MicroSD Settings Guide and Tutorial

While you can utilize any class of microSD card in your gadget, the best micro sd card for Galaxy S7 Edge suggest the microSDXC card is suggested for high-determination video recording because of its extensive stockpiling limit and rapid read/compose ability you can use Sandisk ultra 200gb micro sd too. For less requesting use Micro SD card for Galaxy S7, for example, still photography, customary microSD or microSDHC cards will be adequate.

In the event Galaxy S7 adoptable storage that you are originating from a Moto X Pure Edition, you'll know how this works, however what Samsung has done here is transform the SIM plate of the telephone into a microSD plate too. The SIM plate (and the S7 takes a nano SIM) is situated at the highest point of the telephone and can be shot out by utilizing the included SIM device that Samsung left in the container with the greater part of the telephone's aides. You should simply opening the device into the stick gap for the plate, apply a touch of weight, and it will pop appropriate out. Galaxy S7 Edge MicroSD Settings Guide and Tutorial

Wow Note 7 Permanently Discontinue, is that a tricks?

Note 7 Permanently Discontinue
Wow Note 7 Permanently Discontinue, is that a tricks? - Samsung to Permanently Discontinue Production and Sales of Galaxy Note 7 Samsung additionally reported that it will ask all telecom transporters and retailers to stop deals and trades of the gadget. All purchasers were encouraged to shut down and quit utilizing the Note 7, regardless of the "sheltered" status of the telephone. Samsung is likewise conveying Note 7 "return packs", which comprise of protected boxes and wellbeing gloves, alongside strict guidelines to transport by means of Ground as it were. It's been a harsh ride for Samsung in the second 50% of 2016. After news rose that Samsung would delay the creation of the Note 7, more up to date improvements slaughter off all trusts of the "impermanent stop" perpetually transitioning back to full scale generation.

Wow Note 7 Permanently Discontinue, is that a tricks?

samsung note 7 discontinued and it was put on genuine harm control with the quantity of reports rising each day, in spite of their endeavored review and safe unit substitutions. Oculus even went ahead to incapacitate the Galaxy Note 7 from making utilization of the Gear VR headset "until further notice". This move is liable to chafe a ton of Note 7 clients, a large portion of who likely bought the Note 7 and Gear VR for encountering virtual reality. Yet, seeing this is conceivably perilous that can bring about substantial mischief (especially given VR can overheat gadgets), we completely bolster Oculus' choice. For one thing, yet another Galaxy Note 7 consumed, this time in New Zealand. The source article does not instantly say whether this was a piece of the "sheltered" substitution clump, however observing the telephone was obtained and returned back to New Zealand bearer Spark, the gadget is prone to be of the protected cluster in view of past Samsung orders for substitutions.

Obviously, with the greater part of this occurrence, the destiny of the Note 7 was fixed even before the official declaration. There was no chance the Note 7 would have recaptured the lost piece of the pie and notoriety. Along these lines, declaring the inescapable by recording in with South Korean controllers, Samsung has for all time ended the creation and deals for the Galaxy Note 7. Taking our client's wellbeing as our most elevated need, we have chosen to stop deals and creation of the Galaxy Note 7. The awful news does not end here however for Samsung. Samsung's stock fell 8% in Seoul on Tuesday, which wiped out $17 Billion of Samsung Electronic's fairly estimated worth. This was before the end news was declared, and after the news, the stock dropped facilitate in London with as much as a 9.9% slide down. The gadget review is additionally anticipated to cost the organization another $17 Billion on account of lost offers of up to 19 Million telephones that the Note 7 was required to create amid its item cycle. This figure is a huge ascent from the prior forecasts of $5 Billion in missed deals and review costs that were assessed amid the main review. Clearly, the long haul costs as far as loss of notoriety and brand is not admirable at this stage. With the greater part of this occurrence, there is a decent possibility that the "Note" marking would be slaughtered off. It is pitiful to see the product offering that was once alluded to as the "Ruler of Phablets" bite the dust such an unceremonious passing.

Samsung Electronics Co. said Tuesday that it would for all time stop creation and offers of its beset Galaxy Note 7 cell phone, pulling the attachment on a premium item whose bungled review has conveyed migraines to purchasers and dispensed harm on the Samsung mark. Samsung said in a recording with South Korean controllers that it would for all time stop generation and offers of the gadget, taking after a string of reported occurrences in which as far as anyone knows safe substitutions of the premium cell phone overheated and sometimes burst into flames.

"Taking our client's security as our most elevated need, we have chosen to stop deals and generation of the Galaxy Note 7," the organization said.

Samsung offers tumbled 8%, its greatest one-day decrease in eight years, far outpacing the more extensive South Korean market's 1.2% pullback, after Samsung told Galaxy Note 7 clients worldwide to instantly switch off their gadgets Tuesday. The move goes ahead a day when financial specialists wiped off about $17 billion from Samsung Electronic Co's. market capitalization, as speculators processed the likelihood that the South Korean cell phone mammoth could suspend the whole Galaxy Note arrangement, over a month after it propelled its underlying review of the cell phone.

Prior the organization said it was asking all telecom bearers and retailers that offer the Note 7 all inclusive to stop deals and trades of the gadget pending examination concerning the most recent occurrences. Major U.S. bearers as of now had made that proceed onward their own. Customers with either a unique or a substitution Note 7 ought to shut down and quit utilizing the gadget, said Samsung. As the review has gone from terrible to more regrettable for the world's biggest producer of cell phones by shipments and deals, stock examiners have started counting up the feasible money related hit for Samsung.

Daniel Kim, a Seoul-based investigator for Macquarie, evaluated that the potential misfortunes to Samsung could achieve 3.1 trillion Korean won ($2.8 billion) throughout the previous three months of the year, which would be sufficient to wipe out the whole versatile division's working benefits for the final quarter.

Check Newman, an examiner for Sanford C. Bernstein in Hong Kong, contended that Samsung ought to much consider dumping the Galaxy Note arrangement inside and out, which means no Galaxy Note 8 one year from now. The organization additionally has its lead Galaxy S arrangement to fall back on, which beats the Galaxy Note at a rate of around three to one.

"Samsung necessities to act quickly and proceed onward to ensure their image picture," Mr. Newman told customers on Tuesday. He additionally said the new round of vexed cell phones "asks genuine inquiries" about Samsung's unique clarification for the telephone fiasco, which it faulted for one awful battery supplier that it has since removed of its creation procedure.

As Samsung's stock was failing on Tuesday, South Korea's back pastor Yoo Il-ho told columnists after a week after week strategy meeting in Seoul that the legislature would nearly screen Samsung's review. Mr. Yoo said that an end in deals could adversely affect the nation's fare figures, as indicated by his helpers.

As per South Korea's exchange service, Samsung's portable handsets represent around 2% of the nation's yearly aggregate fares.

Tuesday's advancements were the most recent wanders aimlessly in a worldwide review of 2.5 million cell phones that has been defaced by rehashed slips, sowing disarray among shoppers, aircrafts and telecoms administrators. The review of Samsung's Galaxy Note 7 after a few gadgets burst into flames has put the focus on telephone batteries and the suppliers. This is the means by which batteries can glitch. In its home market of South Korea, Samsung made an offer to rescue client devotion, promising a credit of 30,000 won ($27) to clients who changed to another Samsung cell phone.

In the interim, in China, a major cell phone showcase where Samsung's fortunes have gone south as of late, controllers formally propelled a review of the Galaxy Note 7, toppling Samsung's underlying position that reported blasts in that market were faked. Chinese controllers on Tuesday said that they had recognized 20 instances of overheating or blasts including the Galaxy Note 7 and encouraged clients to switch off their gadgets. Samsung had already rejected territory China from its worldwide review of 2.5 million cell phones, expressing that its gadgets there were sheltered since they did exclude batteries from the supplier that it had at first distinguished as the wellspring of the issue.

Samsung's ease back review isn't prone to help the organization in terrain China as it tries to hook back piece of the overall industry from nearby opponents Huawei Technologies Co., Oppo Electronics Corp., Vivo Electronics Corp. furthermore, Xiaomi Corp., who together with Apple Inc. have pushed Samsung out of the main five cell phone sellers by units delivered. For a few hours after Chinese controllers declared the review, Samsung's Chinese site wasn't upgraded to specify the new advancement, however the organization's past explanations, which had thrown suspicion on Chinese telephone blast reports, seem to have been expelled.

The organization issued an announcement late toward the evening requiring all clients of the gadget to turn in their gadgets. It likewise offered "genuine statements of regret" to clients for any inconvenience that the review had brought about.

Samsung Galaxy Note 7 The Best Phone 2016

Samsung Galaxy Note 7 The Best Phone 2016
Samsung Galaxy Note 7 The Best Phone 2016 - The Note7 Samsung with the quad-core Qualcomm Snapdragon 820 processor, backed by Adreno 530 GPU and 4 GB of RAM. Depending on the market, and Exynos 8890 variant of best smartphones are available as well. Samsung Galaxy Note 7 is Best Phone 2016 and the first waterproof Galaxy Note, it's the first phone ever with Gorilla Glass 5 and the first Galaxy phone with a USB-C port. Day by day Note 7 performance get's understandably identical as well.

Samsung Galaxy Note 7 The Best Phone 2016

The best Note 7 Security with iris scanner and the Note 7 fingerprint sensor as Note 7 features within the system and has potential for upgrade in the future. The available setup performance is definitely plenty powerful. Note 7 smartphones are blazing fast, and everything, from opening, closing and switching between apps, to processor-intensive gaming, is easily handled for superior graphics and gameplay on both the Samsung Note 7.

The Best Phone 2016
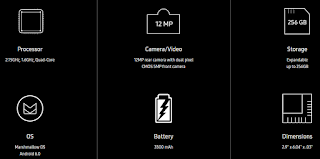
The Samsung Note 7 battery packs is 3,500 mAh battery, which is the largest we’ve seen with a Galaxy Note device, but is still slightly smaller than the 3,600 mAh unit of the Galaxy S7 Edge. The difference in capacity is negligible when it comes to the battery life that is available with both. The Samsung Note 7 battery life provides for five or six hours of screen-on time on a consistent basis, and can comfortably last a full day even with heavy usage. The device available with Galaxy Note7 fast charging capabilities and fast wireless charging as well to charge your phone so quickly on time.

Here more Samsung Galaxy Note 7 features :
  1. The Samsung Note 7 is waterproof with an IP68 rating
  2. The Galaxy Note 7 use USB-C connector
  3. The New Samsung Note 7's S Pen features
  4. Gorilla Glass 5 as Note7 Display
  5. The Iris Scanner Security
  6. The Galaxy Note 7 can make GIFs out of just about anything
  7. The Galaxy Note 7 with Marshmallow, available next for Android Nougat

Samsung Galaxy S7 Edge dedicated as the best smartphone in the world - it's a work of art Weight: 157g | Dimensions: 150.9 x 72.6 x 7.7 mm | OS: Android Marshmallow | Screen size: 5.5-inch | Resolution: 1440 x 2560 | CPU: Exynos 8890 | RAM: 4GB | Storage: 32GB/64GB | Battery: 3600mAh | Rear camera: 12MP | Front camera: 5MP Beautiful screen Super camera Slight plastic feel Expensive. The best Phone 2016 is your choice...


Samsung Galaxy Note 7 Samsung Galaxy S7 Edge
Display 5.7-inch Super AMOLED displayQuad HD resolution, 518 ppi 5.5-inch Super AMOLED displayQuad HD resolution, 534 ppi
Processor 2.15 GHz quad-core Qualcomm Snapdragon 820 processorAdreno 530 GPU 2.15 GHz quad-core Qualcomm Snapdragon 820 processorAdreno 530 GPU
RAM 4 GB 4 GB
Storage 32/64 GBexpandable via microSD card up to 256 GB 64 GBexpandable via microSD card up to 256 GB
Camera 12 MP rear camera, f/1.7 aperture, OIS, LED flash5 MP front-facing camera with wide angle lens 12 MP rear camera, f/1.7 aperture, OIS, LED flash5 MP front-facing camera with wide angle lens
Connectivity Wi-Fi 802.11 a/b/g/n/acBluetooth 4.2NFCGPS + GLONASSUSB Type-C (USB 3.1) Wi-Fi 802.11 a/b/g/n/acBluetooth 4.2NFCGPS + GLONASSmicroUSB 2.0
Battery 3,500 mAh 3,600 mAh
Software Android 6.0 Marshmallow Android 6.0 Marshmallow
Dimensions 153.5 x 73.9 x 7.9 mm169 grams 150.9 x 72.6 x 7.7 mm157 grams

Samsung Galaxy Note 7 Maintenance and Settings

Samsung Galaxy Note 7 Settings
Samsung Galaxy Note 7 Maintenance and Settings - Both the Galaxy Note7 maintaining water and dust resistance. Accompanying S Pen have a water and dust resistant rating of IP68. The Note7 device is dust tight and protected against thirty minutes immersion in fresh water up to 1.5 metres.
Read here how to maintenance your Samsung Note7 and get the best Note7 settings device.

Samsung Galaxy Note 7 Maintenance and Settings

Your Galaxy Note7 supports water resistance and dust resistance. Follow these Note 7 tips carefully to maintain the water- and dust-resistance of your device. Failure to do so may result in damage to your device.
  1. Do not immerse the device in water deeper than 1.5 m or keep it submerged for more than 30 minutes.
  2. Do not expose the device to water moving with force.
  3. If the device is exposed to clean water, dry it thoroughly with a clean, soft cloth. If the device is exposed to other liquids, such as salt water, ionised water, or alcoholic beverage, rinse it with clean water and dry it thoroughly with a clean, soft cloth. If you do not follow these instructions, the device’s performance and appearance may be affected.
  4. If the device has been immersed in water or the microphone or speaker is wet, sound may not be heard clearly during a call. Wipe the device with a dry cloth or dry it thoroughly before using it.
  5. The touchscreen and other features may not work properly if the device is used in water.
  6. Your device has been tested in a controlled environment and certified to be waterand dust-resistant in specific situations (meets requirements of classification IP68 as described by the international standard IEC 60529-Degrees of Protection provided by Enclosures [IP Code]; test conditions: 15-35 °C, 86-106 kPa, 1.5 metre, 30 minutes).
  7. Despite this classification, it is still possible for your device to be damaged in certain situations.
Maintenance Samsung Galaxy Note 7
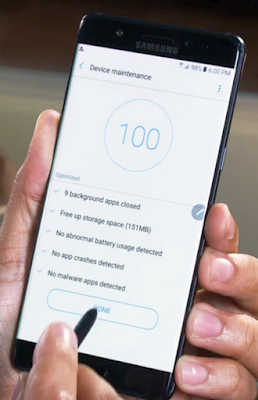
The device maintenance feature provides an overview of the status of your device’s battery, storage, RAM, and system security. You can also automatically optimise the device with a tap of your finger.
    Samsung Galaxy Note 7 Maintenance and Settings
  1. Battery
  2. Storage
  3. Device security
  4. RAM
Note7 Tutorial Using the quick optimisation feature
On the Settings screen, tap Device maintenance → FIX NOW or OPTIMISE NOW.
The quick optimisation feature improves device performance through the following actions.
• Clearing some memory.
• Deleting unnecessary files and closing apps running in the background.
• Managing abnormal battery usage.
• Scanning for malware.

Samsung Note7 Battery Maintenance
Check the remaining battery power and time to use the device. For devices with low battery levels, conserve battery power by activating power saving features. Samsung Galaxy Note 7 Tutorial Maintenance Battery
Open your Note 7, On the Settings screen, tap Device maintenance → Battery.
  1. The usage time left shows the time remaining before the battery power runs out. Usage time left may vary depending on your device settings and operating conditions.
  2. You cannot receive notifications from apps that use power saving mode.
Managing the Galaxy Note 7 Battery
You can save Note7 battery power by preventing apps that are running in the background from using battery power when they are not being used. Tick apps from the apps list and tap SAVE
POWER. Also, tap → Advanced settings to set app power monitor options.
You can set the Galaxy Note7 to charge the battery more quickly. Tap → Advanced settings and tap the Note7 Fast cable charging switch to activate it.

Galaxy Note7 Storage Maintenance
This Note 7 Tutorial to check the status of the used and available memory.
On the Settings screen, tap Device maintenance → Storage.
The actual available capacity of the internal memory is less than the specified capacity because the operating system and default apps occupy part of the memory. The available capacity may change when you update the device.

Managing the memory on Samsung Galaxy Note 7
  1. To delete residual files, such as cache, tap CLEAN NOW.
  2. To delete files or uninstall apps that you do not use any more, select a category under User data.
  3. Then, tick items to select and tap DELETE or UNINSTALL.

Samsung Note 7 RAM Manager
On the Settings screen, tap Device maintenance → RAM.
To speed up your device by reducing the amount of RAM you are using, tick apps from the apps list, and tap CLEAN NOW.

Note7 Device security
Check the device’s security status. This feature scans your device for malware.
On the Settings screen, tap Device maintenance → Device security.

Galaxy Note 7 Applications Manager
Manage the device’s apps and change their settings. You can view the apps’ usage information, change their notification or permission settings, or uninstall or disable unnecessary apps.
On the Settings screen, tap Applications.

Samsung Note7 Lock screen and security
Change the settings for Note7 securing the device and the SIM or USIM card.
On the Settings screen, tap Lock screen and Note 7 security.
The available options may vary depending on the screen lock method selected.
  1. Screen lock type: Change the screen lock method.
  2. Info and app shortcuts: Change settings for the items displayed on the locked screen.
  3. Notifications on lock screen: Set whether or not to show notification content on the locked screen and select which notifications to Note 7 display.
  4. Secure lock settings: Change screen lock settings for the selected lock method.
  5. Fingerprints: Register your fingerprint to the device to secure the device or sign in to your Samsung account. Refer to Note 7 Fingerprint recognition for more information.
  6. Irises: Register your irises to the device to secure the device or sign in to your Samsung account. Refer to Note7 Iris recognition for more information.
  7. Find My Mobile: Activate or deactivate the Find My Mobile feature. Access the Find My Mobile website (findmymobile.samsung.com) to track and control your lost or stolen device.
  8. Unknown sources: Set the device to allow the installation of apps from unknown sources.
  9. Secure Folder: Create a secure folder to protect your private content and apps from others. Refer to Secure Folder for more information.
  10. Secure startup: Protect your device by setting it to require a screen unlock code when turning on the device. You must enter the unlock code to start the device and receive messages and notifications.
  11. Encrypt SD card: Set the device to encrypt files on a memory card.
  12. If you reset your device to the factory defaults with this setting enabled, the device will not be able to read your encrypted files. Disable this setting before resetting the device.
  13. Other security settings: Configure additional security settings.

Galaxy Note 7 Air Command Tutorial with S Pen Settings

Galaxy Note 7 Air Command Tutorial with S Pen Settings - Every note, memo, every image you selected and annotated with the Samsung S Pen Note 7 are now saved into one place: the Samsung Notes 7 app. It's also where you'll find your S Pen files transferred from your old phone via the Smart Switch app. And with access to more brushes and the ability to mix colors, you can use the S Pen to draw and paint and share them directly. But this time, The Note 7 didn't just seal all the ports from the inside, The best s pen Note7 also succeeded in making the S Pen water resistant. Being certified IP68, the Galaxy Note7 can withstand dust, dirt and sand, as well as stay 1.5 meters underwater for up to 30 minutes. The proof is in its precision. Vast improvements have made this stylus even more responsive and water resistant so you can enjoy far more accurate, worry-free strokes. It’s about as close to traditional writing as you can get.

Galaxy Note 7 Air Command Tutorial S Pen Setting

Please read carefully tutorial Note 7 to settings the Air Command. The Note7 Air Command look as the picture below
  1. Air Command Create note: Launch a new note in the Samsung Notes app.
  2. Air Command Smart select: Draw around an area of the screen to collect it in the Gallery app.
  3. Air Command Screen write: Capture screenshots and write or draw on them.
  4. Air Command Translate: Hover the S Pen over a word to see it translated into another language and listen to its pronunciation.
  5. Air Command Add shortcuts: Add up to three apps and functions to the Air command menu.
  6. Air Command Settings: Customize Air command by adding apps and functions, and changing how it appears.
Galaxy Note 7 Air Command Tutorial with S Pen Settings
Here the Air Command Settings on your Note 7 Samsung
Configure settings for Air command. To access Settings:
Tap Air command > Settings. The following options are available:
• Shortcuts: Choose and arrange the shortcuts that appear on the Air command menu.
• Floating icon: Choose to enable the Air command menu to appear as a floating icon that can be moved around the screen.
• About S Pen features: Learn more about S Pen features.

Tutorial to launch the Air command Note7 menu:
Remove the S Pen from the S Pen slot.Or Hold the S Pen near the screen so that the pointer appears, and then press the S Pen button once.

Tutorial Note 7 Create Note
Launch a new note directly in the Samsung Notes app. For more information, see “Samsung Notes” Smart Select on Galaxy Note 7
The Smart Edge on Note 7 select feature provides a capture tool to select content on a screen. You can then add it to your Gallery app or share it with your contacts.
To launch the Smart select tool:
1. Tap Air command > Smart select.
2. Tap a shape at the top of the screen, and then drag a box with the S Pen to select content. The following options appear:
• Auto select: Allow Smart select to automatically select content to extract.
• Extract text: Identify and extract text from the selected content.
• Draw: Draw on the captured screen using the S Pen.
• Share: Choose a sharing method to share your content.
• Save: Save the content to the Gallery app.

S Pen Note 7 Settings
The Note 7 S Pen is a stylus that assists you in performing various functions.
Galaxy Note 7 S Pen button
To maintain the Samsung Galaxy Note 7 water-resistant and dust‑resistant features of your device, make sure that the S Pen slot and opening are both maintained free of dust and water, and the pen is securely inserted prior to any exposure to liquids.
Remove S Pen on note 7
The Note 7 S Pen stores inside your device for convenient access.
1. Push the S Pen inward until it pops out of the device.
2. Slide the S Pen out the rest of the way using the notch on the end of the S Pen.
Tutorial to Configure S Pen Settings
You can configure settings for the S Pen, including options for sounds and for tracking the S Pen when it is not stored in your device.
To configure S Pen settings:
From a Home screen, tap Apps > Settings > S Pen.

Galaxy Note7 Replace the S Pen Tip
You can replace the tip sometimes said the nib of the S Pen with the included kit.
Tutorial to To replace the tip on Note 7:
1. Use tweezers to pull out the S Pen tip.
2. Insert the new pen tip on the top of the S Pen and press until it clicks in place.

Screen Write S Pen Note 7 Tutorial
Screen write allows you to capture a screen shot and then write notes on the screen shot.
To use Screen write:
1. Tap Air command > Screen write.
2. The current screen is captured, and a pen tool appears. The following editing tools are provided:
• Pen: Draw on the screen shot. Press the Pen icon a second time to change the pen tip, size, color, and to save presets.
• Eraser: Erase the writing or drawings on the screen shot. Tap the Eraser icon a second time to change the size of the eraser area and to see
the Erase all option.
• Undo: Undo the last action.
• Redo: Redo the last action that was undone.
• Scroll capture: Capture any scrollable areas of the screen that are hidden.
• Crop: Crop the captured screen.
• Share: Choose a sharing method to share your content.
• Save: Save the content to the Gallery app.
3. Tap Save when finished.
Stay with us to the next Manualandtutorials

How to Create Best Live Broadcast with Samsung Galaxy Note 7

Live Broadcast with Samsung Galaxy Note 7
How to Create Best Live Broadcast with Samsung Galaxy Note 7 - Read here Samsung Note 7 Tutorial to get the best Camera Settings. With The Bigger RAM and high video resolution on the Note 7 and the Samsung Note 7 Edge, you can use your YouTube to share what is happening around you.

How to Create Best Live Broadcast with Samsung Galaxy Note 7

Use this Note 7 Manual and tutorial to make Live video broadcast with the best note 7 features and settings. To access the Live broadcast:
1. From a Home screen, tap Apps > Camera.
2. Swipe to the right and tap Live broadcast.
You need to sign in to your Google Account and enable live broadcasting in your YouTube settings to use this feature.

Samsung Note 7 ManualTutorial
Samsung Note 7 Live Broadcast Options
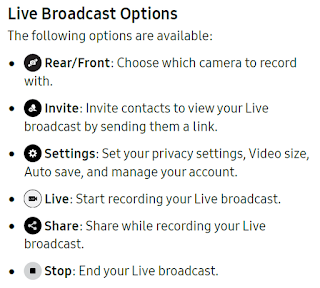
The following options are available:
• Rear/Front: Choose which camera to record with.
• Invite: Invite contacts to view your Live broadcast by sending them a link.
• Settings: Set your privacy settings, Video size, Auto save, and manage your account.
• Live: Start recording your Live broadcast.
• Share: Share while recording your Live broadcast.
• Stop: End your Live broadcast.

Tutorial Note 7 to Record a Live Broadcast
Record and instantly share your videos to YouTube.
1. From a Home screen, tap Apps > Camera.
2. Swipe to the right and tap Live broadcast.
3. Tap Invite and select contacts to share your Live broadcast with. You also have the option to share your Live broadcast during recording and when you finish recording.
4. Press Live to begin recording.
5. When you are finished, tap Stop.

Share a Broadcast use the Note 7
You can share your Live broadcast with Note 7 contacts before recording or share the link after you have finished recording and it has been posted to YouTube with Note7.
To invite contacts before broadcasting:
1. From a Home screen, tap Apps > Camera.
2. Swipe to the right and tap Live broadcast.
3. Tap Invite and select contacts or groups to share your Live broadcast with.
4. Tap Save to send invites.
To share a Live broadcast Note 7 while broadcasting:
►► Tap Share and select a sharing method to share your Live broadcast.
To share Samsung Note 7 Live broadcast after broadcasting:
►► After recording, tap Share link and select a sharing method to share your Live broadcast.

Live Broadcast Video use The Galaxy Note 7 Settings
Customize your Live broadcasts.
1. From a Home screen, tap Apps > Camera.
2. Swipe to the right and tap Live broadcast.
3. Tap Settings and select an option to customize:
  • Account: Tap to add or switch your Google Account.
  • Privacy: Choose either to have your videos unlisted where only friends with a link can view them or public where anyone can view them.
  • Video size: Tap to choose a size option.
  • Social media settings: Share your link with social media when you start broadcasting.
  • Auto save: Tap to enable auto saving your videos to the Gallery app.
  • Auto dim: Dims the brightness if you broadcast without touching the screen.
  • Add shortcut on Home screen: Tap to create a shortcut to Live broadcast on the Home screen.
Samsung Galaxy Note 7 Camera and Video Settings
    Samsung Note 7 Settings
  1. Beauty: Take a picture with lightened faces for gentler images.
  2. Gallery: Open the Gallery to view photos and videos.
  3. Take a picture: Take a picture.
  4. Record video: Record a video.
  5. Camera, Modes, or Effects: Swipe right to change the shooting mode. Swipe left to add an effects filter.
  6. Switch cameras: Switch between the rear and front cameras.
  7. HDR: Enables the light sensitivity and color depth features of the device to produce a brighter and richer picture.
  8. Flash: Activate or deactivate the flash.
  9. Settings: Configure other camera settings.

Take The Best Pictures with Galaxy Note 7 from Samsung
Take pictures with your device’s front or rear camera. Prior to using the camera, remove the plastic protective covering from the camera lens.
1. From a Home screen, tap Apps > Camera.
2. Using the display screen as a viewfinder, compose your shot by aiming the camera at the subject.
While composing your picture, use the available options or these Note 7 gestures:
  • To zoom in or out, touch the screen with two fingers and pinch or spread them on the screen.
  • To focus the shot, tap the screen. When you tap the screen, a brightness scale is displayed. Slide the light bulb up or down to adjust the brightness.
  • To add an effects filter, swipe to the left and tap a preview filter to apply it to the screen.
  • To add a shooting mode, swipe to the right and select a mode.
  • To quickly switch between the front and rear cameras, swipe the screen up or down.
  • To add a camera setting, tap a Galaxy Note 7 Quick settings icon or Settings along the side of the screen.
3. Tap Take a picture to take the picture.
You can also press the Volume key up or down to take a picture. This is the default action of the Volume key while the camera is active. You can also set the Volume key to act as the video record key or as a zoom key.

Shooting Mode on Samsung Note 7
Several visual effects from Samsung Note 7 Camera settings manual are available. Some modes are not available when taking self-portraits.
  1. From a Note 7 Home screen, tap Apps > Camera.
  2. Swipe to the right for the Mode options. Each section indicates which camera (front or rear) the modes are available for.
Samsung Note 7 Rear Camera Options
  1. Auto: Allow the camera to evaluate the surroundings and determine the ideal mode for the picture.
  2. Pro: Manually adjust the ISO sensitivity, exposure value, white balance, and color tone while taking pictures.
  3. Panorama: Create a linear image by taking pictures in either a horizontal or vertical direction.
  4. Selective focus: Change the focus of pictures after they have been taken. You can focus on subjects near to the camera, far away from the camera, or both.
  5. Slow motion: Record videos at a high frame rate for viewing in slow motion. You can play a specific section of each video in slow motion after recording it.
  6. Hyperlapse: Create your own time lapse video by recording at various frame rates. The frame rate is automatically adjusted depending on the scene being recorded and the movement of the device.
  7. Food: Take pictures that emphasize the vivid colors of food.
Samsung Galaxy Note 7 Front Camera Settings Options
Samsung Note 7 Camera Settings
  • Selfie: Take selfie shots and apply various effects, such as an airbrushed effect.
  • Wide selfie: Take wide-angle selfie shots to fit more people into your pictures.
  • Virtual shot: Create multi-directional views of objects.
  • Video collage: Create your own short collages and slow-motion videos without any editing tools.
  • Live broadcast: Broadcast live on YouTube. Share your link with friends so they can watch your video in real time.
  • Download: Download additional shooting modes from the Galaxy Apps store.
  • More options: See more options for the camera modes.
Samsung Galaxy Note7 Camera Settings
You can adjust your camera’s settings using the icons on the main camera screen and the full camera settings menu.
1. From a Home screen, tap Apps > Camera.
2. Tap Settings to configure settings for the Camera.
Available options vary depending on the camera or recording mode used.

Samsung Note 7 Rear camera Settings Options
  • Picture size: Select a resolution. Use higher resolution for higher quality. Higher resolution pictures take up more memory.
  • Video size: Select a resolution. Use higher resolution for higher quality. Higher resolution videos take up more memory.
  • Tracking AF: Focus on and track a subject selected on the preview screen.
  • Shape correction: Correct distortion in pictures automatically.
Samsung Note7 Front camera Settings Options
  • Picture size: Select a resolution. Use higher resolution for higher quality. Higher resolution pictures take up more memory.
  • Video size: Select a resolution. Use higher resolution for higher quality. Higher resolution videos take up more memory.
  • Save pictures as previewed: Save the self‑portrait or self‑recording as viewed on the camera screen, not as flipped images.
  • Timer: Take time-delayed pictures or videos.
  • Motion photo: Create a short video by taking pictures.
  • Video stabilization: Activate anti-shake. Anti‑shake helps to keep the focus steady when the camera is moving.
  • Grid lines: Display viewfinder grid lines to help composition when selecting subjects.
  • Location tags: Attach a GPS location tag to the picture.
  • Review pictures: Set to show pictures after taking them.
  • Quick launch: Open camera by pressing the Home key twice in quick succession.
  • Storage location: Select the memory location for storage. This option only appears if an optional memory card (not included) is installed.
  • Voice control: Take pictures by saying “Smile”, “Cheese”, “Capture”, or “Shoot”, or record videos by saying “Record Video”.
  • Volume keys function: Use the Volume key as the camera key, the record key, or for system volume.
  • Shutter sound: Enable or disable a shutter sound when pictures are taken.
  • Reset settings: Reset the camera settings.
  • Help: View information on using the camera.
  • Ways to take pictures:
- Tap to take pics: Tap the screen to take selfies.
- Gesture control: Detect your palm and automatically take a picture two seconds later.
- Use heart rate sensor: Once your face has been recognized, tap the heart rate sensor to take your picture.

How to View Images and Videos on Galaxy Note 7 or Note 7 Edge?
To View, edit, and manage pictures and videos. Some functions described in this section are only available if there are images or videos in the Gallery. Launching Gallery displays available folders. When another Galaxy Note7 app, such as Email, saves an image, a Download folder is automatically created to contain the image. Likewise, capturing a screenshot automatically creates a Screenshots folder.
1. From a Home screen, tap Apps > Gallery.
2. Tap Pictures, Albums, or Stories to change the way images and videos are displayed.
• In Albums view, you can create albums to organize your images. Tap Albums, and then tap More options > Create album.
3. Depending on the view mode selected, either tap an image or video to view it, or first tap an album or folder and then tap an image or video.
• When viewing an image or video, you can swipe left or right to view the next or previous image or video.

Galaxy Note 7 Zoom In or Out
Use one of the following methods to zoom in or out on an image:
• Double-tap anywhere on the screen to zoom in or zoom out.
• Spread two fingers apart on any place to zoom in. Pinch the screen to zoom out.

Play Best Videos with Galaxy Note 7 Settings
You can play videos stored on your device.
1. From a Home screen, tap Apps > Gallery.
2. Tap a folder or category to open it.
3. Tap a video to view it.
4. Tap Play video to play the video.

Trim Segments of a Video
You can trim segments of a video.
  1. Select a video, and then tap the screen once to see the video options.
  2. Tap Edit, and then tap Trim.
  3. Use the sliders at the bottom of the screen to trim the video. Move the left bracket to the desired starting point, and then move the right bracket to the desired ending point.
  4. Tap Export to save the video. Modify the File name or Resolution, and then tap Export to confirm the changes.
Edit Images on Samsung Note7
You can edit images stored on your device. While viewing an image, tap the screen once to see the following Note7 Tutorial options:
  • Auto adjust: Apply adjustments determined by built-in correction software.
  • Share: Send the image to your contacts by email, messaging, social media, cloud accounts, or other methods.
  • Edit: View and use the editing tools.
  • Delete: Delete the image from your device.
  • Favorite: Mark the image as a favorite, and then access it from the Favorites view.
  • More options:
  • - Rotate left: Rotate the picture counter‑clockwise.
  • - Rotate right: Rotate the picture clockwise.
  • - Details: View and edit information about the image, including the date created, location, and properties.
  • - Slideshow: Start a slideshow with the images and videos in the current folder.
  • - Set as contact picture: Set the image as the photo for a contact.
  • - Set as wallpaper: Set the image as a wallpaper for the Home and Lock screens.
  • - Print: Send the image to an available printer.
Tutorial Note 7 to Share Images and Videos
You can share images and videos from your Gallery.
  1. From a Home screen, tap Apps > Gallery.
  2. Tap a folder to open it.
  3. In a folder, tap More options > Share, select images and videos, and then tap Share to send them to others or share them with social network services. or
  4. While viewing a single image or video, tap Share to send it to others or share it with social network services.
Manual Note 7 Samsung to Delete Images and Videos
You can delete images stored on your device.
  1. From a Home screen, tap Apps > Gallery.
  2. Tap a folder to open it.
  3. Tap More options > Edit.
  4. Tap images and videos to select them, or tap the All checkbox at the top of the screen to select all images and videos.
  5. Tap Delete, and confirm when prompted. or
  6. When viewing a single image or video, tap Delete.

Samsung Galaxy Note 7 Edge Manual

Samsung Galaxy Note 7 Edge Tutorial
Samsung Galaxy Note 7 Edge Manual - Learn with us about your Samsung Note7 mobile device Manual, hardware, assembly procedures, tips and how to get started with some tutorial using your new Samsung Note 7 device. The Note 7 Edge Screen from Samsung provides a variety of useful tools for notifications, information feeds, and timekeeping.

Samsung Galaxy Note 7 Edge Manual

Read here About the samsung tutorial Note7 Edge Screen. You can view the current software version and license information for the Edge screen feature. Tutorial to view the current software version and license :
1. From a Home screen, tap Apps > Settings.
2. Tap Edge screen > About Edge screen.

Edge Panels
Edge panels can be used to access apps, tasks, and contacts, as well as view news, sports, and other information on the Edge screen.
Tutorial to view Edge panels:
►► When the screen is turned on, swipe the Edge panel handle from the edge of the screen to the center. Keep swiping to view other panels.
The Manual Note 7 to configure Edge panels:
►► From any screen, open the Edge screen, and then tap Edge panel settings.

Apps on Samsung Note 7 Edge
You can add up to ten apps in two columns to the Note 7 Apps edge panel.
Note 7 Tutorial to view Apps edge:
►► When the screen is turned on, swipe the Edge panel handle from the edge of the screen to the
center. Keep swiping until the Apps edge panel is displayed.

Note7 Samsung Manual to configure Apps edge:
1. From any screen, open the Edge screen, and swipe until the Apps edge panel is displayed.
2. Tap Add application to add other apps to the Apps Note 7 Edge.
  • To add an app to the Apps edge, find it on the left side of the screen and tap it to add it to an available space on a column on the right.
  • To change the order of the apps on the Edge panel, drag each app to the desired location.
  • To remove an app, tap Delete.
3. Tap Back to save changes.

People Edge Note 7
People edge allows you to set the Edge Note 7 screen to light up with distinct colors when you receive notifications about contacts in your My people list. You can also use this Note 7 panel to quickly communicate with contacts in your My people list.
Note7 Tutorial To view People edge:
►► When the screen is turned on, swipe the Edge panel handle from the edge of the screen to the center. Keep swiping until the People edge panel is displayed.
Note 7 Edge Manual To configure People edge:
1. From any screen, open the Edge screen, swipe until the People edge panel is displayed.
2. Tap Add contact to add other contacts to the People edge.
• To remove a contact, touch and hold the contact and then drag it to Remove.
• To change the order of the contacts on the Edge panel, drag each contact to the desired location.
3. Tap OnCircle to communicate with your friends using images, stickers, and other fun messages.
4. Tap Back to save changes.

Galaxy Note 7 Tasks Edge
You can add shortcuts to common tasks performed with stock apps to the Tasks edge panel. Up to ten tasks in two columns can be added.

To view Tasks edge:
►► When the screen is turned on, swipe the Edge panel handle from the edge of the screen to the center. Keep swiping until the Tasks edge panel is displayed.

To configure Tasks edge:
1. From any screen, open the Edge screen, swipe until the Tasks edge panel is displayed.
2. Tap Add shortcut to add other tasks to the Tasks edge.
  • To add a shortcut to the Tasks edge, find it on the left side of the screen and drag it on to an available space on a column on the right.
  • To change the order of the tasks on the Edge panel, drag each task to the desired location.
  • To remove a task, tap Delete.
3. Tap Back to save changes.

Note 7 Edge Feeds

Edge Note 7 Samsung feeds display select information and notifications on the Edge screen when the screen is turned off.
To view Edge feeds:
►► When the screen is turned off, quickly swipe your finger along the Edge screen in one direction, and then back in the opposite direction.

Samsung Galaxy Note 7 Edge Panels
Samsung Galaxy Note 7 Edge Manual
Here the Note 7 tutorial and Manual to configure Edge panels:
1. From a Home screen, tap Apps > Settings.
2. Tap Edge screen > Edge panels.
3. Tap On/Off to enable the feature. The following options are available:
  • Checkbox: Enable or disable each panel.
  • Edit (if available): Configure individual panels by tapping.
  • Download: Search for and download more Edge panels.
  • More options > Handle settings: Drag Edge panel handle to change the position of the Edge panel handle along the edge of the screen, and then configure the following Edge panel handle settings:
- Position: Choose either Right side or Left side to set which side the Edge screen appears on.
- Size: Choose the size of the Edge screen handle. It can be Small, Medium, or Large.
- Transparency: Drag the slider to adjust the transparency of the Edge screen handle.
• More options > Reorder: Change the order of the panels by dragging them to the left or right.
4. Tap Back to save changes.

Note 7 Samsung Edge Feeds
Edge feeds display select information and notifications on the Edge screen when the screen is turned off.
To configure the Edge feeds:
1. From a Home screen, tap Apps > Settings.
2. Tap Edge screen > Edge feeds.
3. Tap On/Off to activate the Edge feeds feature.
• Checkbox: Enable or disable each feed.
• Edit (if available): Configure a feed.
• Download: Search for and download more Edge feeds.
• More options > Edge feed timeout: Configure how long the Edge screen stays on when activated.
• More options > Reorder: Change the order of the panels by dragging them to the left or right.
4. Tap Back to save changes.

Galaxy Note 7 Edge Lighting
You can set the Edge screen to light up when you receive calls or notifications while the device is turned over. Edge lighting and Quick reply are features that activate when your device is turned over (display side down). The Galaxy Note 7 Edge lighting illuminates the Edge screen when a notification is received. If People edge is also on, the color of the indicator is the one assigned to the contact who is calling or messaging.
To turn on Edge lighting:
1. From a Home screen, tap Apps > Settings.
2. Tap Edge screen > Edge lighting.
3. Tap On/Off to turn on the feature. The following feature is available:
• Quick reply: Reject an incoming phone call with a text message by placing your finger on the heart rate sensor for two seconds. The calls rejected, and a preset message is sent to the caller.
- Tap On/Off to enable Quick reply.
- To edit the message, tap Quick reply, and then tap the Quick reply message.

Thank to the Samsung Galaxy Note 7 Edge Manual, we hope this guide can help you knowing the new note 7 and get best and better on your device. You can download as Note 7 Manual pdf. Don't foget read more our tips and tutorial on this sitemap.

S Pen Note 7 Tutorial

Galaxy Note 7 Tutorial
S Pen Note 7 Tutorial, Read here The S Pen Samsung Galaxy Note7 with a stylus that assists you in performing various functions. To maintain the water-resistant and dust‑resistant features of your device, make sure that the S Pen slot and opening are both maintained free of dust and water, and the pen is securely inserted prior to any exposure to liquids.

S Pen Note 7 Tutorial

Samsung Galaxy Note7 Tutorial to Remove S Pen
The S Pen stores inside your device for convenient access.
1. Push the S Pen inward until it pops out of the device.
2. Slide the S Pen out the rest of the way using the notch on the end of the S Pen.

Note 7 Air View
Hover the Note7 S Pen over the screen to preview content, or view information about an item on the screen.
Spen Note7 For example:
  1. Hover over an email in a list to preview the message before opening it.
  2. Hover over a photo album to preview the contents or see a picture enlarged.
  3. Hover over the timeline during video playback to preview and navigate to specific scenes.
  4. Hover over an icon or screen button to view the item’s name or description.
Note: The preview function is only available when the
S Pen’s onscreen pointer is a solid color.

Galaxy Note 7 Direct Pen Input
When filling out a form field in an app (like Name or Phone number in Contacts), you can open a Handwriting window to allow you to write an entry with the S Pen rather than type.
To use the S Pen Handwriting window:
1. When filling out a form field, hover the S Pen over the field until the Handwriting icon appears.
2. Tap Handwriting. The Handwriting window appears.
3. Use the space provided in the window to write an entry by hand using the S Pen. While writing, your entries are converted into text.
• To edit the converted text, use the Space, Delete, and Enter icons. To change the position of the cursor, drag the pointer below the cursor to the
desired position for editing.

Note7 Screen Off Memo
You can write quick memos without turning your device on.
Note: The screen off memo setting must be enabled.
For more information, see “S Pen Galaxy Note7 Settings”
To create a screen off memo:
1. Detach the S Pen while the screen is off.
2. Write on the screen.
• Tap Save to save your memo to the Samsung
Notes screen off memo app.
• Tap Delete to discard the memo.
Configure S Pen Settings Note 7
You can configure settings for the S Pen, including options for sounds and for tracking the S Pen when it is not stored in your device.
To configure S Pen settings:
►► From a Home screen, tap Apps > Settings > S Pen.
We hope this tutorial can guide you better using the New Galaxy Note7

Samsung Galaxy Note 7 User guide, Manual PDF & Tutorial

Samsung Galaxy Note 7 User guide, Manual PDF & Tutorial

Samsung Galaxy Note 7 Manual PDF & Tutorial
Samsung Galaxy Note 7 User guide release date news and tutorial here, learn how to setup Samsung Galaxy Note 7, reviews specs price, you can download Samsung Galaxy Note 7 manual pdf here. We talk about the new Samsung Galaxy Note 7. Every new release always be a hot topic. We are curiously waiting for the new Samsung Galaxy Note 7, could it be Note 7 or maybe it will have different name, no one really knows about it. Everything about Samsung Galaxy Note 6 Release Date, News and Rumors now becomes a trending topic for almost all people, especially for some of them who love Samsung. We all have many expectations about how the new iPhone looks like, its specs, new features, and many more. Is there any of you people imagine about a new iPhone will show up with? We all round up about it curiously.

Samsung Galaxy Note 7 Specs

Samsung Galaxy Note 7 User guide, Manual PDF & Tutorial
Weibo account from the untamed prairies of the Chinese tech blogosphere now comes a tip that the following Galaxy Note 7 will touch base with a 5.8" Slim RGB AMOLED show with 1440 x 2560 determination and 1024 weight focuses. The "thin" part likely means the self-evident - that Samsung might have figured out how to recoil the showcase bundle foot shaped impression, yet does RGB mean it will get rid of the PenTile "precious stone pixel" network? This would enthusiasm to take after, as it would propose another creation innovation for Samsung's AMOLED showcases will be in store with the Note 6. The new 5.8" screen size, in the event that it is not gathered together from 5.7" and change, would likewise recommend something comparative. In addition, if Samsung in reality outs a 5.1" Galaxy S7 and 5.5" Galaxy S7 Edge one week from now, a marginally bigger than 5.7 inches board would offer it some assistance with differentiating the Note 6 considerably encourage in its portfolio, particularly on the off chance that it brandishes the stellar screen-to-body proportion of its ancestor.

Samsung Galaxy Note 7 User guide, Manual PDF & TutorialExperiencing whatever is left of the specs sheet tipped here we see the Note 6 recorded with 6 GB of RAM, which might sound needless excess, yet how about we not overlook that Samsung set 3 GB of RAM in the Galaxy S6 a year ago, while the Note 5 has 4 GB. Besides, Samsung as of late reported that it has begun mass creating 12Gb LPDDR4 RAM chips utilizing a 20nm procedure innovation, being the primary organization on the globe to accomplish the deed. As Samsung itself noted in the public statement, this will permit the making of cell phones with 6 GB of RAM. As there are 8 bits in a byte, a 12Gb chip can really hold in 1.5GB of data. By matching together four such chips in a double channel config, Samsung can now make cell phones that accompany an incredible 6 GB of RAM, so this part of the specs list here doesn't sound all that distant any more.

Samsung Galaxy Note 7 User guide

Samsung Galaxy Note 7 User guide, Manual PDF & Tutorial
If you are new with your Samsung Galaxy Note 7 please browse Samsung Galaxy Note 7 User guide on this page to know more about your new devices beginner’s guide, setup guide, the features, reviews, tips tricks and news update about Samsung Galaxy Note 7 User manual please explore this website via this sitemap page. To know the basic functions of your Samsung Galaxy Note 7 User guide , please see the user manual pdf below.

Samsung Galaxy Note 7 User Manual PDF

You can read online Samsung Note 7 Guide or download Samsung Galaxy Note 7 manuals PDF on this site, user manual PDF will be available when released from the official site of Samsung
Read more for Samsung galaxy note 7 wireless charging and Get Free Gear VR on Note 7 Samsung

Here The Samsung Z Fold4 / Flip4 User Manual You can read here and download by follow the link here

Samsung Galaxy S7 and Galaxy S7 Edge MicroSD Setting

Samsung Galaxy S7 and Galaxy S7 Edge are both anticipated that would transport with Qualcomm Snapdragon 820, 4GB of RAM, and 32GB inbuilt stockpiling. While the Galaxy S7 is said to brandish a 3000mAh battery, its bended form will be supported by a 3600mAh battery. Clearly, the organization will uncover the accessibility dates for both the cell phones amid the occasion yet gossip says that these by Samsung on March 11.

Samsung Galaxy S7 and Galaxy S7 Edge MicroSD Setting

Galaxy S7 and Galaxy S7 Edge MicroSD Setting
The Samsung Galaxy S7 and the Samsung Galaxy S7 Edge are additionally prone to highlight a weight touchy Samsung Galaxy S7 and Galaxy S7 Edge presentation. This could work simply like 3D Touch on iPhone 7, iPhone 6s and iPhone 6s Plus. Another hole asserts that the individuals who pre-request these Samsung cell phones will get them around three days before they are accessible in stores.

You can't survive without water or your cell phone, which is the reason the Galaxy S7 edge and Galaxy S7 has an IP681 rating. That implies it repulses spills, sprinkles and even dunks so you can spare the rice for cooking. No compelling reason to burrow around for continuous redesigns when they're conveyed with a solitary swipe. Also, since the photo on the screen wraps around the double edge, you'll see significantly more.

Samsung Galaxy S7 and Galaxy S7 Edge MicroSD Setting

How to install MicroSD or a memory card on Samsung Galaxy S7 and Galaxy S7 Edge?
to Install MicroSD on Samsung Galaxy S7 and Galaxy S7 Edge MicroSD Settings Follow this installing tutorial.
Your device accepts memory cards with maximum capacities of 200 GB. Depending on the memory card manufacturer and type, some memory cards may not be compatible with your device.
Caution.
Galaxy S7 and Galaxy S7 Edge MicroSD Setting

  1. Some memory cards may not be fully compatible with the device. Using an incompatible card may damage the device or the memory card, or corrupt the data stored in it.
  2. Use caution to insert the memory card right-side up.
  3. The device supports the FAT and the exFAT file systems for memory cards. Formatting MicroSD on Samsung Galaxy S7 and Galaxy S7 Edge
  4. When inserting a card formatted in a different file system, the device asks to reformat the memory card.
  5. • Frequent writing and erasing of data shortens the lifespan of memory cards.
  6. When inserting a memory card into the device, the memory card’s file directory appears in the My Files → SD card folder.
  7. Insert the ejection pin into the hole on the tray to loosen the tray.
  8. Ensure that the ejection pin is perpendicular to the hole. Otherwise, the device may be damaged.
  9. Pull out the tray gently from the tray slot.
  10. When you remove the tray from the device, the mobile data connection will be disabled.
  11. Place a memory card on the tray 2 with the gold-coloured contacts facing downwards.
  12. Gently press the memory card into the tray to secure it.
  13. Insert the tray back into the tray slot.
  14. If you insert the tray into your device while the tray is wet, your device may be damaged. Always make sure the tray is dry.
  15. Fully insert the tray into the tray slot to prevent liquid from entering your device.

Samsung Galaxy S7 and Galaxy S7 Edge MicroSD Setting

How to removing the memory card
Before removing the memory card, first unmount it for safe removal.
On the Home screen Samsung Galaxy S7 and Galaxy S7 Edge, tap
Apps → Settings → Storage → SD card → Unmount. Next read this instructions below :
  1. Insert the ejection pin into the hole on the tray to loosen the tray.
  2. Pull out the tray gently from the tray slot.
  3. Remove the memory card.
  4. Insert the tray back into the tray slot.
  5. Do not remove the memory card while the device is transferring or accessing information. Doing so can cause data to be lost or corrupted or damage to the memory card or device. Samsung is not responsible for losses that result from the misuse of damaged memory cards, including the loss of data.
Formatting the memory card on Samsung Galaxy S7 and Galaxy S7 Edge
A memory card formatted on a computer may not be compatible with the device.
Format the memory card on Samsung Galaxy S7 and Galaxy S7 Edge.
On the Home screen Samsung Galaxy S7 and Galaxy S7 Edge MicroSD Setting, tap
Apps → Settings → Storage → SD card → Format → FORMAT.
Caution.
Before formatting the memory card, remember to make backup copies of all important data stored in the memory card. The manufacturer’s warranty does not cover loss of data resulting from user actions.