Showing posts with label Galaxy on7. Show all posts

Set Up Voicemail On Samsung Galaxy

How to Set Up Voicemail On Samsung Galaxy
Set Up Voicemail On Samsung Galaxy - Your Samsung voicemail and password should have been set up initially by your wireless service provider when the device was activated. Learn how to setup, settings, access from Samsung Galaxy or other device. If you are having issues accessing your voicemail, please contact your wireless service provider.

Set Up Voicemail On Samsung Galaxy

Access voicemail on Samsung Galaxy by listening to the messages or by reading them in the visual voicemail application on your on Samsung Galaxy series.

Manual to Set Up Voicemail On Samsung Galaxy

Screens Display and settings available may vary by wireless service provider and software version.
    Manual to Set Up Voicemail On Samsung Galaxy
  1. From the Home screen, touch Apps .
  2. Touch Phone .
  3. Touch and hold the number 1 or, if available, touch . The icon is displayed at the top of your screen when you have a voicemail.
How to access voicemail on Samsung Galaxy
Access Voicemail from Samsung Galaxy
  1. From a Home screen, tap the Phone (located in the lower-left).
    • If not available, navigate: Apps Apps icon > Phone.
  2. From the Keypad (green icon located at the bottom), touch and hold the number 1.
    • Alternate method: Enter *86 (*VM) then tap the Send icon.
  3. If prompted, enter the voice mail password then press the # key.
Access Voice mail from a different Phone or when Outside the service provider coverage area:
  1. Call your 10-digit mobile number.
  2. If dialing from an international location, you need a Place an International Call for additional assistance.
  3. As soon as the Voice Mail greeting starts, press the # key then enter the Voice Mail password.
  4. If prompted, re-enter the mobile number.

Set Up Voicemail Guide

This article applies only to Basic Voicemail for sample from Verizon Wireless USA. It's show you how to set up Voicemail, add a pause so that a PIN can be entered and voicemail accessed without entering a PIN each time.

Voicemail Tutorial
Set Up Voicemail On Samsung Galaxy

Updating Voicemail service on your Galaxy phone. If you've been notified of these changes, you need to set up a new voicemail box in order to receive new voice messages.

How to Set Up Voicemail On Samsung Galaxy
Learn set up voicemail by follow this voice mail manual instuctions:
  1. Call *86 (*VM) from the handset or the 10-digit mobile number from another phone.
  2. If a system greeting is played, press the Pound key (#) immediately to interrupt the greeting.
  3. Follow the instructions for choosing the language options then press the # key to confirm the choice.
  4. Press 1 for English then press the # key to confirm.
  5. When prompted, enter the 4-7digit password then press the # key.
  6. If setting up the password for the first time, it can't have repeating digits (e.g., 1111) or consecutive digits (e.g., 1234).
  7. When prompted, say the signature (or name) then press the # key.
  8. To confirm the signature (or name), press the # key.
  9. When prompted, say the greeting then press the # key.
  10. To confirm the greeting, press the # key.
  11. To set up additional features, refer to Voicemail Options for assistance.
We hope this manual / tutorial help you to setup voicemail on Samsung Galaxy, settings, access from Samsung Galaxy or other device. If you are having issues, more settings and accessing your voicemail, you can contact your service provider to better solutions.

Restore Samsung Galaxy To Factory Settings

How to Restore Samsung Galaxy To Factory Settings
Restore Samsung Galaxy To Factory Settings - Restore your device’s settings or perform a factory data reset. You can reset and restore all settings and network settings back as a new from the official Samsung. By reading this manual will help and guide you to restore Samsung Galaxy to Factory settings also set the device to restart at a preset time for device optimisation or device freezes or hangs, you may need to close apps

Restore Samsung Galaxy To Factory Settings

You can set your device to perform a factory data reset if you enter the unlock code incorrectly several times in a row and reach the attempt limit. If you got most Galaxy prolems, follow this instrustion manual:

Restarting the device
  • If your device freezes or hangs, you may need to close apps or turn off the device and turn it on again.
Forcing restart / Hard Reset
  • If your device is frozen and unresponsive, press and hold the Power key and the Volume Down key simultaneously for more than 7 seconds to restart it.

Reset and Restore To Factory Settings
Samsung Manual to reset facory settings:
  • Launch the Settings app, tap Lock screen and security → Secure lock settings, and then tap the Auto factory reset switch to activate it.

Your device freezes or encounters a fatal error
  • Try the following solutions. If the problem is still not resolved, contact a Samsung Service Centre.
Manual Resetting the Samsung Galaxy

Restore Samsung Galaxy To Factory SettingsBefore performing the factory data reset, remember should make backup copies of all important data stored in the device before you got problems or upgrade to new device. Encrypt SD card will set the device to encrypt files on a memory card. If you reset your device to the factory defaults with this setting enabled, the device will not be able to read your encrypted files. Disable this setting before resetting the device. If you registered a Google account to the device, you must sign in to the same Google account after resetting the device. If the methods above do not solve your problem, perform a factory data reset.

How to Restore Samsung Galaxy To Factory Settings
Samsung User Guide to reset facory settings some people said master reset:
  • Launch the Settings app and tap General management → Reset → Factory data reset →RESET → DELETE ALL.
Restore Samsung Galaxy
Sync, back up, or restore your Samsung Galaxy device’s data using Samsung Cloud. You can also register and manage accounts, such as your Samsung account or Google account, or transfer data to or from other devices via Smart Switch.
  • On the Settings screen, tap Cloud and accounts.
Regularly back up your data to a safe location, such as Samsung Cloud or a computer, so that you can restore it if the data is corrupted or lost due to an unintended factory data reset.
  1. Samsung Cloud: Manage the content that you want to store securely in Samsung Cloud. Check the usage status of your Samsung Cloud storage, and sync, back up, and restore your data.
  2. My Profile: Manage your personal information and Samsung account details.
  3. Accounts: Add your Samsung and Google accounts, or other accounts, to sync with.
  4. Backup and restore: Keep your personal information, app data, and settings safe on your device. You can back up your sensitive information and access it later. You must sign in to your Google or Samsung account to back up or restore data.
  5. Smart Switch: Launch Smart Switch and transfer data from your previous device.
Restore Samsung Galaxy To Factory Settings
Back up data and Restore from Samsung Cloud
Back up data from your previous device to Samsung Cloud and restore the data to your new device. You must register and sign in to your Samsung account to use Samsung Cloud.

Backing up Samsung Galaxy Data
  1. On your previous device, sign in to your Samsung account.
  2. Launch the Settings app, select the backup option, and back up your data.
    • If your device supports Samsung Cloud, launch the Settings app, tap Cloud and accounts → Samsung Cloud → Backup settings, and then back up your data.
    • The data backup method may vary depending on your model.
    • Some data will not be backed up. To check which data will be backed up, launch the Settings app, tap Cloud and accounts → Samsung Cloud → Backup settings.
Restoring Samsung Galaxy data
  1. On your new device, launch the Settings app and tap Cloud and accounts → Samsung Cloud → Restore.
  2. Tap and select the previous device from the devices list.
  3. Tick the data types you want to restore and tap RESTORE NOW.

Back up and Restore Secure Folder on Samsung Galaxy Series

Back up content and apps in Secure Folder to Samsung Cloud using your Samsung account and restore them later.

Back up Secure Folder Data
  1. Launch the Secure Folder app and tap → Settings → Backup and restore.
  2. Tap Add account and register and sign in to your Samsung account.
  3. Tap Back up Secure Folder data.
  4. Tick items you want to back up and tap BACK UP NOW.
Data will be backed up to Samsung Cloud.
Restoring Secure Folder Data
  1. Launch the Secure Folder app and tap → Settings → Backup and restore.
  2. Tap Restore backup.
  3. Select a device and the data types you want to restore and tap RESTORE NOW.
Backed up data will be restored to your Samsung Galaxy device.

Backup and Restore Samsung Galaxy

Keep your personal information, app data, and settings safe on your device. You can back up your sensitive information and access it later. You must sign in to your Google or Samsung account to back up or restore data.

Using a Samsung account
  • On the Settings screen, tap Cloud and accounts → Backup and restore → Backup settings for the Samsung account, tap the switches next to the items you want to back up to activate them, and then tap BACK UP NOW.
Data will be backed up to Samsung Cloud.

Automatically back up data
  • To set the Samsung Galaxy to automatically back up data, tap the AUTO BACK UP switch to activate it.
Restore From Samsung Cloud
  1. To restore backup data from Samsung Cloud using a Samsung account, tap Restore.
  2. Select a device and the data types you want to restore and tap RESTORE NOW. The selected data will be restored to your Samsung Galaxy.
Back Up Using a Google account
  1. On the Settings screen, tap Cloud and accounts → Backup and restore
  2. Tap the Back up my data switch for the Google account to activate it.
  3. Tap Backup account and select an account as the backup account.
Restore Using Google account
  1. To restore data using a Google account
  2. Tap the Automatic restore switch to activate it.
  3. When you reinstall apps, backed up settings and data will be restored.
Samsung Galaxy Tips:

Always make backup copies of all important data stored in the Samsung Galaxy series. Otherwise, you cannot restore data if it is corrupted or lost. Samsung is not responsible for the loss of data stored in the device.

Galaxy S7 Edge MicroSD Settings Guide and Tutorial

Galaxy S7 Edge Guide and Tutorial
Galaxy S7 Edge MicroSD Settings Guide and Tutorial - With the Galaxy S7 and Galaxy S7 Edge, Samsung conveyed back the SDCard for Galaxy S7 Edge card space to much enjoyment. While they may have skipped on Android 6.0's Adoptable Storage, there may not be that enormous of an issue, since they are as yet permitting you to move applications over to an embedded SD card and exploit cards up to 200GB to Galaxy S7. Since a number of you might go to the S7 or S7 Edge from a past Galaxy gadget and haven't seen Samsung's freshest usage of a Galaxy S7 SD card slot opening, we thought we'd impart that to you today.

Galaxy S7 Edge MicroSD Settings Guide and Tutorial

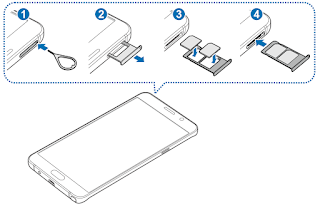
Presently, once you have the SIM plate out, you'll see there are two openings: one is for your nano SIM and the other is for a microSD card. In the video underneath, you'll see precisely where to put each, however you'll additionally perceive how sensitive and watchful you should be while doing as such, particularly as you slide the plate once more into the telephone.

This isn't a troublesome Galaxy S7 SD card support procedure, however once more, simply be watchful. Here Galaxy S7 Edge Guide embed or remove the MicroSD™ Card in the Galaxy S7 Edge :

Your gadget gives you a chance to utilize a microSD, microSDHC™, or microSDXC™ card to grow memory space. This protected advanced card gives you a chance to trade pictures, music, and information with microSD perfect gadgets. Embed the microSD Card with the ejector instrument into the opening in the SIM and microSD card plate on the highest point of your gadget, as demonstrated as follows. At the point when the plate flies out, haul it out of the gadget. Please, take mind not to embed the ejector device into the amplifier gap likewise on top of your gadget.

Painstakingly put the Galaxy S7 SD card size / microSD card into the bigger opening in the plate and embed the plate. Galaxy S7 Guide SIM card is in the littler opening, bring down on the plate.

Galaxy S7 Edge Tutorial Expel the microSD Card
  1. You should unmount the microSD card before expelling it.
  2. From the Home screen, touch Apps .
  3. Touch Settings .
  4. Look to and touch Storage .
  5. Touch alongside SD™ card to securely unmount the microSD card.
Galaxy S7 Edge MicroSD Settings Guide and Tutorial
Embed the ejector instrument into the opening in the SIM and microSD card plate on the highest point of your gadget, as demonstrated as follows. At the point when the plate flies out, haul it out of the gadget. Take mind not to embed the ejector device into the mouthpiece gap likewise on top of your Galaxy S7. Here the expel the microSD card from the plate and reinsert the plate.

SD Card Recommendations for Galaxy S7 Edge
  1. microSD Card Classes
  2. microSD cards have limit up to 2GB.
  3. microSDHC (High Capacity) cards offer limit up to 32GB.
  4. microSDXC (eXtended Capacity) cards have limit from more than 32GB and up to 2TB, as of now.
  5. Every sort of card has a speed rating of 2, 4, 6, 8, or 10, from slowest to quickest.
Galaxy S7 Edge MicroSD Settings Guide and Tutorial

While you can utilize any class of microSD card in your gadget, the best micro sd card for Galaxy S7 Edge suggest the microSDXC card is suggested for high-determination video recording because of its extensive stockpiling limit and rapid read/compose ability you can use Sandisk ultra 200gb micro sd too. For less requesting use Micro SD card for Galaxy S7, for example, still photography, customary microSD or microSDHC cards will be adequate.

In the event Galaxy S7 adoptable storage that you are originating from a Moto X Pure Edition, you'll know how this works, however what Samsung has done here is transform the SIM plate of the telephone into a microSD plate too. The SIM plate (and the S7 takes a nano SIM) is situated at the highest point of the telephone and can be shot out by utilizing the included SIM device that Samsung left in the container with the greater part of the telephone's aides. You should simply opening the device into the stick gap for the plate, apply a touch of weight, and it will pop appropriate out. Galaxy S7 Edge MicroSD Settings Guide and Tutorial

Samsung Galaxy On7 Manual and Tutorial

Samsung Galaxy On7 Manual and Tutorial
Samsung Galaxy On7 Manual and Tutorial - The Samsung Galaxy On7 (2016) runs Android 6.0 and is controlled by a 3300mAh non removable battery. It quantifies 151.70 x 75.00 x 8.00 (stature x width x thickness) and weighs 167.00 grams. Read Samsung Galaxy On7 Manual PDF here and learn how to get the best settings Galaxy on7 Tutorial for you.

Samsung Galaxy On7 Manual and Tutorial

Samsung Galaxy On7 (2016) cell phone was propelled in September 2016. The telephone accompanies a 5.50-creep touchscreen show with a determination of 1080 pixels by 1920 pixels. The Samsung Galaxy On7 (2016) is controlled by 2GHz octa-center Qualcomm Snapdragon 625 processor and it accompanies 3GB of RAM. The telephone packs 32GB of inward stockpiling that can be extended up to 256GB through a microSD card. To the extent the cameras are concerned, the Samsung Galaxy On7 (2016) packs a 13-megapixel essential camera on the back and a 8-megapixel front shooter for selfies.

Samsung Galaxy On7 Manual
Established in 1969 as Samsung Electric Industries, Suwon, South Korea-headquartered Samsung Electronics today makes everything from TVs to semiconductors. It discharged its first Android cell phone in 2009, and can be credited with the dispatch of the main Android tablet in 2010. The organization is among the greatest players in the cell phone advertise on the planet. It has as of late created cell phones running Tizen OS, as a contrasting option to its Android-based cell phones. The Samsung Galaxy On7 (2016) is a double SIM (GSM and GSM) cell phone that acknowledges two Micro-SIM. Availability alternatives incorporate Wi-Fi, GPS, Bluetooth, FM, 3G, 4G. Sensors on the telephone incorporate Proximity sensor, Ambient light sensor, Accelerometer, and Gyroscope.

Samsung Galaxy On7 Tutorial
Samsung Galaxy On7 Manual and Tutorial
Surf Like a Pro - Appreciate fast perusing with 4G empowered Galaxy On7 Pro. With Ultra Data Saving mode, set aside to 50%* Results based under Samsung Internal lab test conditions. Singular results may change. The information as you can shop on the web, stream recordings or download your most loved applications.
Amusement Like a Pro - With upgraded memory in the Galaxy On7 Pro, play your most loved amusements flawlessly and mount the pioneer board to pro it.
Ride Like a Pro - The S bicycle mode in Galaxy On7 Pro keeps undesirable calls under control with the goal that you can continue riding strain free

Samsung Galaxy On7 Manual Camera
The snappy dispatch camera highlight ensures that you never miss a delightful minute. It has other energizing components like:
1. Palm motion selfie mode.
2. 120 degree selfie mode.

Samsung Galaxy On7 Tutorial Camera
Show - Flawless to the finest detail, the HD show gives you clear hues and difference for an energetic survey encounter.
Plan - With its amazing outline and premium false calfskin back, the Galaxy On7 Pro takes your style articulation a step higher.

Samsung Galaxy On7 Specs

Samsung Galaxy on7 Specifications
Network Technology GSM / HSPA / LTE
2G bands GSM 850 / 900 / 1800 / 1900 - SIM 1 & SIM 2
3G bands HSDPA 850 / 900 / 1900 / 2100
4G bands LTE
Speed HSPA, LTE
GPRS Yes
EDGE Yes
Launch Announced 2016, September
Status Coming soon. Exp. release 2016, October
Body Dimensions 151.7 x 75 x 8 mm (5.97 x 2.95 x 0.31 in)
Weight 167 g (5.89 oz)
SIM Dual SIM
Display Type Capacitive touchscreen, 16M colors
Size 5.5 inches (~73.3% screen-to-body ratio)
Resolution 1080 x 1920 pixels (~401 ppi pixel density)
Multitouch Yes
Platform OS Android OS, v6.0.1 (Marshmallow)
Chipset Qualcomm MSM8953 Snapdragon 625
CPU Octa-core 2.0 GHz Cortex-A53
GPU Adreno 506
Memory Card slot microSD, up to 256 GB (dedicated slot)
Internal 32 GB, 3 GB RAM
Camera Primary 13 MP, f/1.9, autofocus, LED flash
Features Geo-tagging, touch focus, face detection
Video 1080p@30fps
Secondary 8 MP, f/1.9
Sound Alert types Vibration; MP3, WAV ringtones
Loudspeaker Yes
3.5mm jack Yes
Comms WLAN Wi-Fi 802.11 b/g/n, Wi-Fi Direct, hotspot
Bluetooth v4.2, A2DP
GPS Yes, with A-GPS, GLONASS/ BDS (region dependent)
Radio To be confirmed
USB microUSB v2.0
Features Sensors Fingerprint, accelerometer, proximity
Messaging SMS(threaded view), MMS, Email, Push Mail, IM
Browser HTML5
Java No
- Fast battery charging
- ANT+ support
- MP4/H.264 player
- MP3/WAV/eAAC+ player
- Photo/video editor
- Document viewer
Battery Non-removable Li-Ion 3300 mAh battery
Misc Colors Gold, Rose Gold, Black

Samsung Galaxy On7 User Manual PDF
You can read here the Samsung Galaxy On7 User Guide or download the Samsung Galaxy On7 Manual PDF.